Excel_Interface_2

Excel ribbon

Microsoft Excel ribbon is the row of tabs and icons at the top of the Excel window that allows you to quickly find, understand and use commands for completing a certain task. It looks like a kind of complex toolbar, which it actually is.

The ribbon first appeared in Excel 2007 replacing the traditional toolbars and pull-down menus found in previous versions. In Excel 2010, Microsoft added the ability to personalize the ribbon.

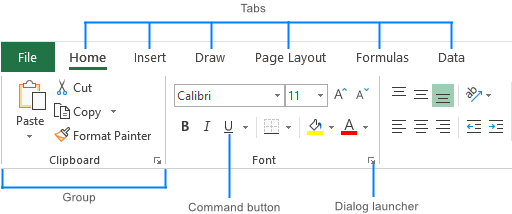
The ribbon in Excel is made up of four basic components: tabs, groups, dialog launchers, and command buttons.

  • Ribbon tab contains multiple commands logically sub-divided into groups.
  • Ribbon group is a set of closely related commands normally performed as part of a larger task.
  • Dialog launcher is a small arrow in the lower-right corner of a group that brings up more related commands. Dialog launchers appear in groups that contain more commands than available space.
  • Command button is the button you click to perform a particular action.

Excel ribbon

Ribbon tabs

The standard Excel ribbon contains the following tabs, from left to right:

File – allows you to jump into the backstage view that contains the essential file-related commands and Excel options. This tab was introduced in Excel 2010 as the replacement for the Office button in Excel 2007 and the File menu in earlier versions.

Home – contains the most frequently used commands such as copying and pasting, sorting and filtering, formatting, etc.

Insert – is used for adding different objects in a worksheet such as images, charts, PivotTables, hyperlinks, special symbols, equations, headers and footers.

Draw – depending on the device type you’re using, it lets you draw with a digital pen, mouse, or finger. This tab is available in Excel 2013 and later, but like the Developer tab it is not visible by default.

Page Layout – provides tools to manage the worksheet appearance, both onscreen and printed. These tools control theme settings, gridlines, page margins, object aligning, and print area.

Formulas – contains tools for inserting functions, defining names and controlling the calculation options.

Data – holds the commands for managing the worksheet data as well as connecting to external data.

Review – allows you to check spelling, track changes, add comments and notes, protect worksheets and workbooks.

View – provides commands for switching between worksheet views, freezing panes, viewing and arranging multiple windows.

Help – only appears in Excel 2019 and Office 365. This tab provides quick access to the Help Task Pane and allows you to contact Microsoft support, send feedback, suggest a feature, and get quick access to training videos.

Developer – provides access to advanced features such as VBA macros, ActiveX and Form controls and XML commands. This tab is hidden by default and you have to enable it first.

Add-ins – appears only when you open an older workbook or load an add-in that customizes the toolbars or menu.

Contextual ribbon tabs

In addition to the constant tabs described above, the Excel ribbon also has context-sensitive tabs, aka Tool Tabs, which show up only when you select a certain item such as a table, chart, shape, or picture. For example, if you select a chart, the Design and Format tabs will appear under Chart Tools.
Contextual ribbon tabs in Excel

Tip. If you are just starting out in Excel, Ribbon Hero might come in handy. It’s a game created by Office Labs to help people explore the most useful features of the Office ribbon. Although this project is not actively developed or supported further, it is still available for download on the Microsoft web-site.

How to hide ribbon in Excel

If you’d like to get as much space as possible for your worksheet data (which is especially the case when using a laptop with a small screen), you can minimize the ribbon by pressing the Ctrl + F1 shortcut.

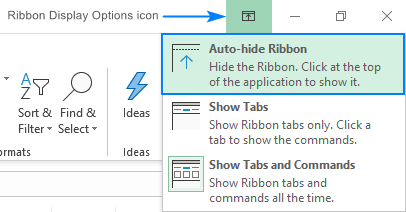
Or you can hide the ribbon completely by clicking the Ribbon Display Options button at the upper-right corner of the Excel window, and then clicking Auto-hide Ribbon.
Hide Excel ribbon.

How to unhide ribbon in Excel

If suddenly all commands disappeared from your Excel ribbon and only tab names are visible, press Ctrl + F1 to get everything back.

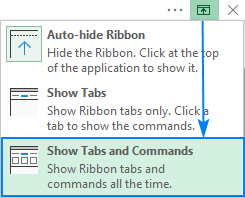
If the entire ribbon is missing, click the Ribbon Display Options button and choose Show Tabs and Commands.
Unhide the ribbon in Excel.

How to customize Excel ribbon

If you wish to personalize the ribbon for your needs so you know exactly where everything is located, you can easily do that too.

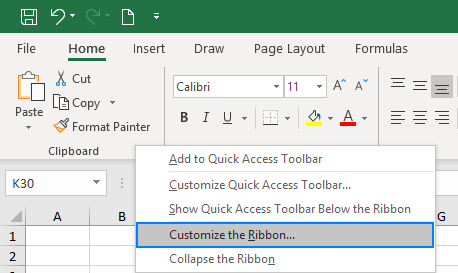
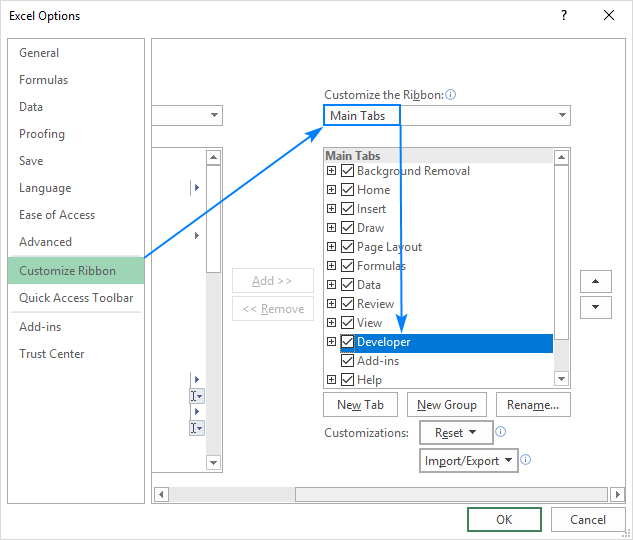
Your entry point to most customizations is the Customize Ribbon window under Excel Options. And the shortest path to it is to right-click on the ribbon and select Customize the Ribbon… from the context menu:
Customize the ribbon in Excel.

From there, you can add your own tabs with any commands you choose, change the order of tabs and groups, show, hide, rename tabs, and a lot more.

How to show Developer tab in Excel

The Developer tab is a very useful addition to the Excel ribbon that allows you to access a number of advanced features such as VBA macros, ActiveX and Form controls, XML commands, and more. The problem is that the Developer tab is hidden by default. Luckily, it’s very easy to enable it. For this, right-click the ribbon, click Customize the Ribbon, select Developer under Main Tabs, and click OK.
Enabling the Developer tab in Excel

In the same manner, you can activate other tabs that are available in Excel but not visible on the ribbon, e.g. the Draw tab.

Quick Access Toolbar

In addition to the ribbon that accommodates most commands available to you in Excel, a small set of frequently used commands is located on a special toolbar at the top of the Excel window for quick access, hence the toolbar name.
Quick Access Toolbar in Excel

The Quick Access Toolbar can also be customized and positioned above or below the ribbon. 

Create a Drop-down List

To create a drop-down list in Excel, execute the following steps.

1. On the second sheet, type the items you want to appear in the drop-down list.

Items

Note: if you don’t want users to access the items on Sheet2, you can hide Sheet2. To achieve this, right click on the sheet tab of Sheet2 and click on Hide.

2. On the first sheet, select cell B1.

Select Cell

3. On the Data tab, in the Data Tools group, click Data Validation.

Click Data Validation

The ‘Data Validation’ dialog box appears.

4. In the Allow box, click List.

5. Click in the Source box and select the range A1:A3 on Sheet2.
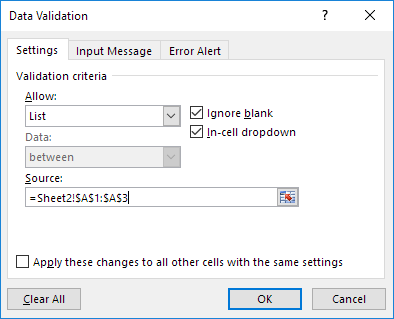
Validation Criteria

6. Click OK.

Result:

Drop-down List in Excel

Note: to copy/paste a drop-down list, select the cell with the drop-down list and press CTRL + c, select another cell and press CTRL + v.

7. You can also type the items directly into the Source box, instead of using a range reference.
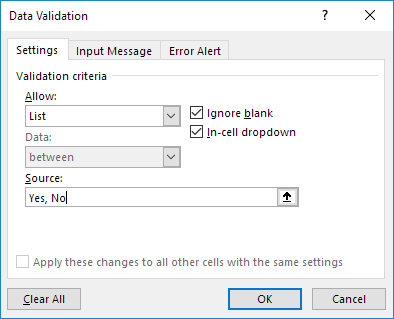
Simple Drop-down List

Note: this makes your drop-down list case sensitive. For example, if a user types yes, an error alert will be displayed.

Allow Other Entries

You can also create a drop-down list in Excel that allows other entries.

1. First, if you type a value that is not in the list, Excel shows an error alert.

Error Alert

To allow other entries, execute the following steps.

2. On the Data tab, in the Data Tools group, click Data Validation.

Click Data Validation

The ‘Data Validation’ dialog box appears.

3. On the Error Alert tab, uncheck ‘Show error alert after invalid data is entered’.
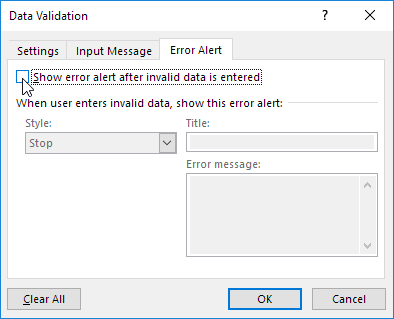
Allow Other Entries

4. Click OK.

5. You can now enter a value that is not in the list.

Manual Input

Add/Remove Items

You can add or remove items from a drop-down list in Excel without opening the ‘Data Validation’ dialog box and changing the range reference. This saves time.

1. To add an item to a drop-down list, go to the items and select an item.

Select Item

2. Right click, and then click Insert.
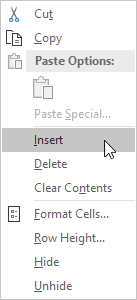
Click Insert

3. Select “Shift cells down” and click OK.
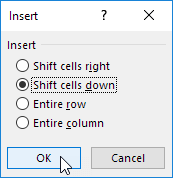
Shift Cells Down

Result:

New Range Reference

Note: Excel automatically changed the range reference from Sheet2!$A$1:$A$3 to Sheet2!$A$1:$A$4. You can check this by opening the ‘Data Validation’ dialog box.

4. Type a new item.

Type New Item

Result:

Updated Drop-down List

5. To remove an item from a drop-down list, at step 2, click Delete, select “Shift cells up” and click OK.

Dynamic Drop-down List

You can also use a formula that updates your drop-down list automatically when you add an item to the end of the list.

1. On the first sheet, select cell B1.

Select Cell

2. On the Data tab, in the Data Tools group, click Data Validation.

Click Data Validation

The ‘Data Validation’ dialog box appears.

3. In the Allow box, click List.

4. Click in the Source box and enter the formula: =OFFSET(Sheet2!$A$1,0,0,COUNTA(Sheet2!$A:$A),1)
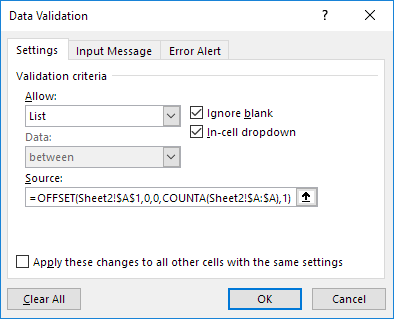
Offset Function

Explanation: the OFFSET function takes 5 arguments. Reference: Sheet2!$A$1, rows to offset: 0, columns to offset: 0, height: COUNTA(Sheet2!$A:$A) and width: 1. COUNTA(Sheet2!$A:$A) counts the number of values in column A on Sheet2 that are not empty. When you add an item to the list on Sheet2, COUNTA(Sheet2!$A:$A) increases. As a result, the range returned by the OFFSET function expands and the drop-down list will be updated.

5. Click OK.

6. On the second sheet, simply add a new item to the end of the list.
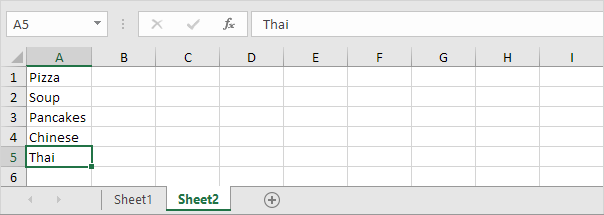
Add New Item

Result:

Dynamic Drop-down List

Remove a Drop-down List

To remove a drop-down list in Excel, execute the following steps.

1. Select the cell with the drop-down list.

Select Cell with Drop-down List

2. On the Data tab, in the Data Tools group, click Data Validation.

Click Data Validation

The ‘Data Validation’ dialog box appears.

3. Click Clear All.
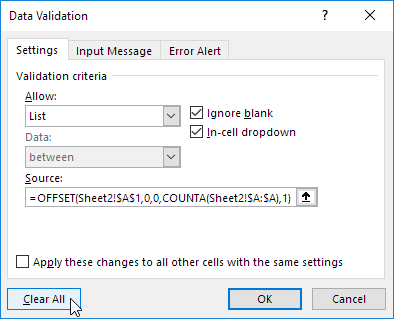
Click Clear All

Note: to remove all other drop-down lists with the same settings, check “Apply these changes to all other cells with the same settings” before you click on Clear All.

4. Click OK.

Dependent Drop-down Lists

Want to learn even more about drop-down lists in Excel? Learn how to create dependent drop-down lists.

1. For example, if the user selects Pizza from a first drop-down list.

First Drop-down List

2. A second drop-down list contains the Pizza items.

Second Drop-down List

3. But if the user selects Chinese from the first drop-down list, the second drop-down list contains the Chinese dishes.

Dependent Drop-down Lists in Excel

Table Magic

You can also store your items in an Excel table to create a dynamic drop-down list.

1. On the second sheet, select a list item.

Select List Item

2. On the Insert tab, in the Tables group, click Table.
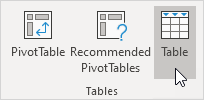
Insert Table

3. Excel automatically selects the data for you. Click OK.

Create Table

4. If you select the list, Excel reveals the structured reference.
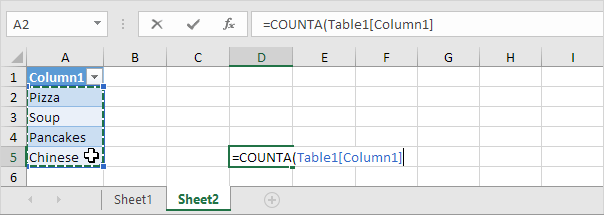
Structured Reference

5. Use this structured reference to create a dynamic drop-down list.
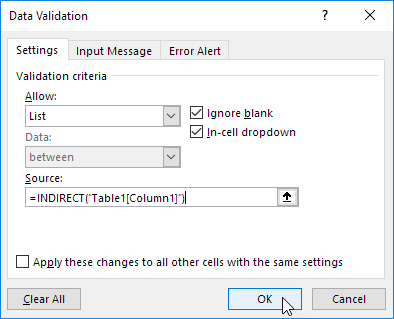
Table and INDIRECT

Explanation: the INDIRECT function in Excel converts a text string into a valid reference.

6. On the second sheet, simply add a new item to the end of the list.
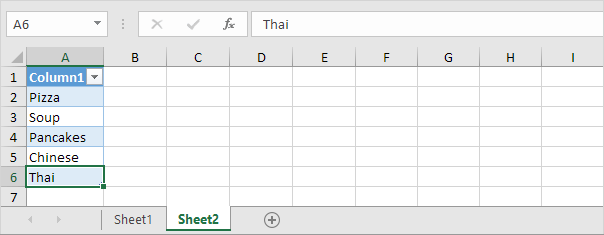
Add Item

Result:

Dynamic Drop-down List

Note: try it yourself. Download the Excel file and create this drop-down list.

7. When using tables, use the UNIQUE function in Excel 365/2021 to extract unique list items.
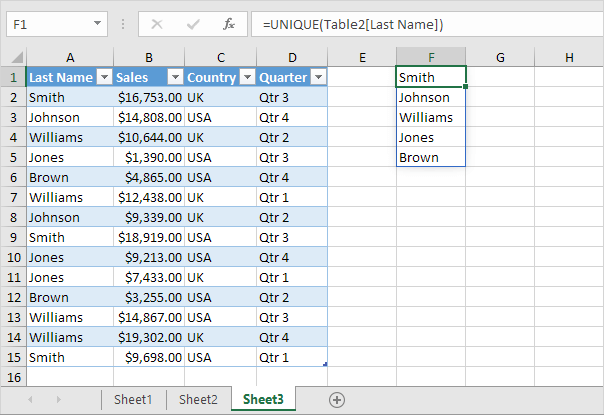
Unique List Items

Note: this dynamic array function, entered into cell F1, fills multiple cells. Wow! This behavior in Excel 365/2021 is called spilling.

8. Use this spill range to create a magic drop-down lis
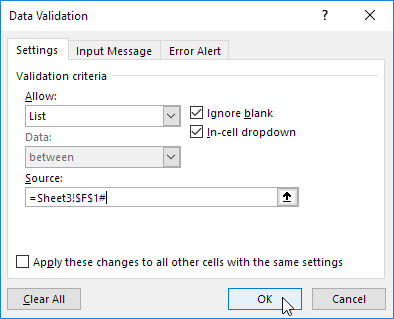
Create Drop-down List

Explanation: always use the first cell (F1) and a hash character to refer to a spill range.

Result:

Drop-down List With Unique Values

Note: when you add new records, the UNIQUE function automatically extracts new unique list items and Excel automatically updates the drop-down list.

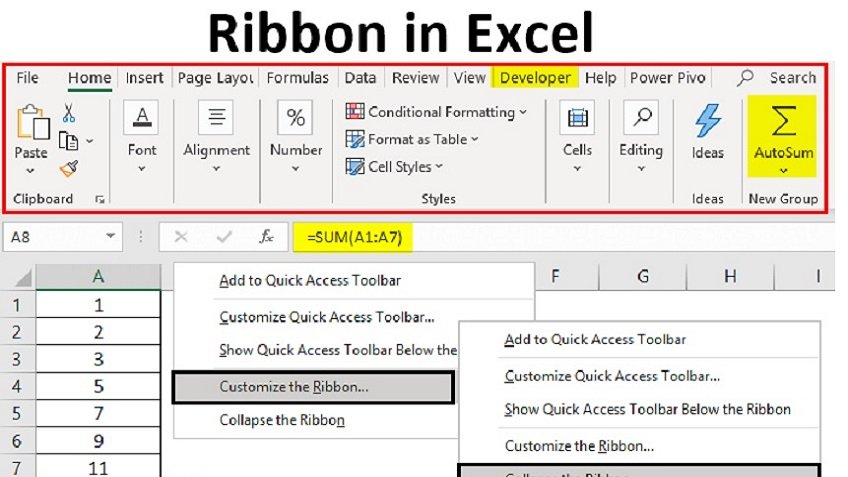
Find the Dialog Box Launcher

One way to open dialog boxes is to use the dialog box launcher. The launcher is a small downward-pointing arrow located in the bottom right corner of individual groups or boxes on the ribbon.

Examples of groups with a dialog box launcher include:

  • The Font and Number groups on the Home tab
  • The Charts group on the Insert tab
  • The Page Setup and Sheet Options groups on the Page Layout tab

Access Function Dialog Boxes

Not all dialog box launchers in Excel are found in the corner of ribbon groups. Some, such as those found under the Formulas tab, are associated with individual icons on the ribbon.


The dialog box makes it easy to enter information related to the function’s arguments, such as the location of data and other input options.

The Formulas tab in Excel contains groups of functions that have similar purposes in the Function Library. Each group name has a dialog box launcher associated with it. When you select these down arrows, a drop-down menu opens and displays individual function names. Selecting a function’s name in the list opens its dialog box.

Work With Non-Dialog Box Options

It is not always necessary to access features and options in Excel through a dialog box. For example, many of the formatting features found on the Home tab of the ribbon, such as the bold feature, are found on single choice icons. Select these icons once to activate the feature and select a second time to turn the feature off.